How To Structure Your Machine Learning Project

Data scientist. I write about data science, machine learning and analytics. I also write about career and productivity tips to help you thrive in the field.
Data science juniors often focus on understanding how libraries like Scikit-Learn, Numpy, and Pandas work. Many MOOCs push a lot on concepts that revolve around the latter, leaving out the management component of a data science project.
As much as a junior may know about algorithms, libraries and programming in general, the success of a project is also related to its structure. A confusing structure can impact significantly the performance of the analyst, who must continually orientate himself among a huge amount of files and TO-DOs. This is even more emphasized if more people are involved in the project.
In this article, I will share my boilerplate for structuring data science projects. This organization is inspired by the work of Abhishek Thakur (@abhi1thakur on Twitter), Kaggle’s well-known Grandmaster, from his book Approaching Almost Any Machine Learning Problem (highly recommended — read here).
While many data scientists use Jupyter to work on their projects, we will use an IDE such as VSCode or PyCharm. Jupyter and its notebooks will only be used for exploratory analysis and graph generation. In this way, we can focus on creating a plug & play template that with a few small changes can be adapted to almost any data science problem.
Project Structure
Let’s see the structure of files and folders. Let’s create a folder with the name of our project — in our case we will call it project. In project, we will have this structure:
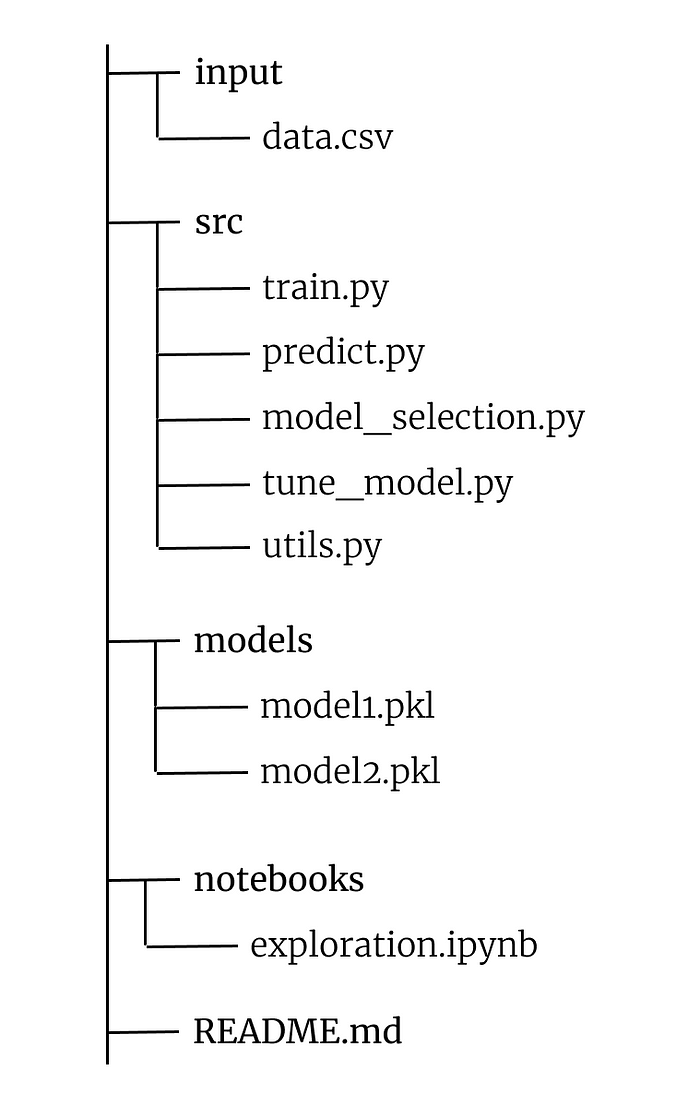
The input folder will contain the data and material source files related to the project dataset.
The src folder will instead contain all the actual work files.
train.py: this script will train the model chosen by tune_model.py. It will return a model saved to disk in pickle format
predict.py: is the script to call to make a prediction with the model generated by train.py
model_selection.py: in this script we will write code that will return a reference for the best performing model for our dataset
tune_model.py: will serve to pass the result of model_selection.py to the hyperparameter optimization pipeline
utils.py: it will contain all our helper functions that we will need during the project
The models folder will contain the models returned by train.py and saved in pickle format.
Notebooks will be our exploration environment where we will place all our .ipynb notebooks.
README.md instead will be our “instruction manual” — here we will insert the necessary documentation to communicate the behavior of our software.
How To Use This Boilerplate
I typically start a data science / ML project by creating the README.md file. It is critically important to use it to document every step of our process. In the initial stages I use it as a collector of ideas, starting with a brainstorming activity, and then slowly skimming it, eventually coming to have a simple but straight-to-the-point documentation.
In parallel or immediately after I start working with notebooks. Here I explore the data and try to understand if there are particular conditions to pay attention to (missing values, particular patterns, presence of outliers, and so on). Inside the notebook itself I always use cells between the various code snippets to comment or create an explanatory markdown of what I’m doing. I start filling the utils.py file with the various functions that I know will help me at the script level.
When I feel I have become familiar with the dataset, I go to model_selection.py to test the baseline and find the best-performing model. tune_model.py is closely related to model_selection.py, as the selected model is supplied directly to a hyperparameter optimization pipeline, often performed with GridSearchCV or Optuna.
From here it’s simple — train.py takes care of training the optimized model and evaluating its performance, predict.py is called to make inferences instead.
Conclusion
With this boilerplate, you will have a starting point for structuring your data science projects. Feel free to expand and modify the logic of this structure to suit your needs.


