Beyond RAG: Network Analysis through LLMs for Knowledge Extraction
End-to-end data science project using Streamlit, Upstash, and OpenAI to build better knowledge navigation and comprehension using network analysis

Data scientist. I write about data science, machine learning and analytics. I also write about career and productivity tips to help you thrive in the field.
This article will guide you through an end-to-end data science project using several state-of-the-art tools in the AI space. This tool is called Mind Mapper because it allows you to create conceptual maps by injecting information into a knowledge base and retrieving it in a smart way.
The motivation was to go beyond the “simple” RAG framework, where a user queries a vector database and its response is then fed to an LLM like GPT-4 for an enriched answer.
Mind Mapper leverages RAG to create intermediate result representations useful to perform some kind of knowledge intelligence which is allows us in turn to better understand the output results of RAG over long and unstructured documents.
Simply speaking, I want to use RAG as a foundational step to build diverse responses, not just textual. A mind map is one of such responses.
Here are some of the tool’s features:
Manages text in basically all forms: copy-paste, textual and originating from audio source (video is contemplated too if the project is well received)
Uses an in-project SQLite database for data persistence
Leverages the state-of-the-art Upstash vector database to store vectors efficiently
Chunks from the vector database are then used to create a knowledge graph of the information
A final LLM is called to comment on the knowledge graph and extract insights
We’ll use Streamlit as library for frontend rendering of our logic. All of the code will be written in Python.
If you want to take a look at the app you’ll be building, check it out here
https://mind-mapper.streamlit.app/
I have uploaded a series of text documents copy-pasted from Wikipedia about prominent individuals in the AI world like Sam Altman, Andrej Karpathy, and more. We’ll query this knowledge base to demonstrate how the project works.
A mind map appears like this, when using a prompt like
“Who is Andrej Karpathy?”

Feel free to navigate the linked application, provide your OpenAI API key and Upstash REST Url + Token and prompt the existing knowledge base for some demo insights.
The deployed Streamlit app has the inputs section disabled to avoid exposing the database publicly. If you build the app from the ground up or clone it from Github, you’ll have the database available under the main branch of the project.
If this introduction stimulated your curiosity, then join me and let’s dive deeper into the explanations and code!
Here’s the Github of the project if you want to follow along.
How Does It Work?
The software works following this algorithm
user uploads or pastes text into the software and saves the data into a database. User can also upload an audio track which gets transcribed thanks to OpenAI’s Whisper model
when the data is saved, it is split into textual chunks and these chunks are then embedded using OpenAI ada-002 model
vectors are saved into Upstash vector database, with metadata attached
when user asks a question to the assistant, the query is embedded using the same model and that vector is used to retrieve the top n most similar chunks using dot product similarity metric
these similar chunks of text, which are related to the input query, are fed into an AI agent responsible of extracting entities and relationships from all the chunks
these entities and relationships make up a Python dictionary which is then used to build the mind map
another agent reads the content of the same dictionary and creates a comment to describe the mind map and highlight relevant information
END.
The Tools
Let’s briefly go through the project dependencies to get a better understanding of the blocks that make up the logic.
Poetry
I use Poetry for basically all of my projects. It is a convenient and simple Python env and package manager. You can download Poetry from this link.
If you cloned the repository, all you have to do is poetry install inside the project’s folder in your terminal. Poetry will install and take care of it all.
Upstash Vector Database
Upstash was really a recent discovery and I felt I wanted to test it out with a real project. While Upstash’s been releasing state of the art products for some time, it was missing a vector database. Less than a month ago, the company release the vector database, which is fully on the cloud and free for experimentation and a lot more. I found myself enjoying using it’s API, and the online service had 0 lag.
OpenAI
As mentioned, this project leverages Whisper for audio file transcription and GPT-4 to empower the agents to extract and comment the mind map. We could also use open source models if we wanted to.
If you haven’t already, you can setup an OpenAI API key at this link here.
NetworkX
NetworkX empowers the mind map component in the software. It takes care of creating nodes of entities and edges among these. With Plotly, the interactive visualization lib, you can really visualize complex networks. You can read more about the lib at this link.
Streamlit
There are a bunch of core libraries like Pandas and Numpy but I won’t even list them here. On the other hand, Streamlit has to be mentioned because it makes the frontend possible. A real boon for data scientists that have little knowledge of frontend frameworks and JavaScript.
Now that we have an better idea of the main components of our software, let’s start building it from scratch. Sit tight because it’s going to be quite a long read.
The Project’s Structure
This is how the complete project appears:
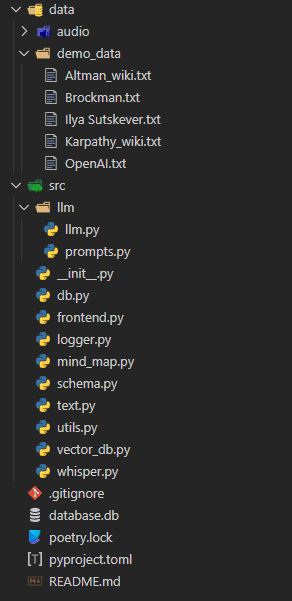
Obviously the logic is contained in the src folder. It contains the bulk of the logic, while there’s a dedicated folder for the llm parts. We’ll go step by step and build all of the scripts. We’ll start with the one dedicated to the data structure, i.e. schema.py.
Schema, Database and Helpers
Let’s start by defining the information schema. It’s often the first thing I do when working with data. We’ll use SQLModel and Pydantic to define an Information object that will store the information and allow table creation in SQLite.
# schema.py

from sqlmodel import SQLModel, Field
from typing import Optional

import datetime
from enum import Enum


class FileType(Enum):
    AUDIO = "audio"
    TEXT = "text"
    VIDEO = "video"


class Information(SQLModel, table=True):
    id: Optional[int] = Field(default=None, primary_key=True)
    filename: str = Field()
    title: Optional[str] = Field(default="NA", unique=False)
    hash_id: str = Field(unique=True)
    created_at: float = Field(default=datetime.datetime.now().timestamp())
    file_type: FileType
    text: str = Field(default="")
    embedded: bool = Field(default=False)

    __table_args__ = {"extend_existing": True}
Each text we’ll input in the database will be an Information. It will have
and ID, which will act as a primary key and thus be autoincremental
a filename that will indicate the name of the file uploaded in string format
a title that the user can specify optionally in string format
hash_id: created by encoding with MD5 hashing the text. We’ll use the hash ID to perform database operations like read, delete and update.
created_at is automatically generated by using as a default value the current time indicating when the item was saved in database
file_type indicates whether the input data was textual, audio or video (not implemented, but could be)
text contains the source data used for the entire logic
embedded is a boolean value that will help us point to the items that have been embedded and thus present in the cloud vector database
Note: the piece of code __table_args__ = {"extend_existing": True} is necessary be able to access and manipulate data in the database from Streamlit.
Now that we got the data schema down, let’s write our first utility function: the logger. It is an incredibly useful thing to have, and thanks to the lib Rich we’ll also enjoy having some cool colors in the terminal.
# logger.py

import logging
from rich.logging import RichHandler
from typing import Optional


def get_console_logger(name: Optional[str] = "default") -> logging.Logger:
    logger = logging.getLogger(name)
    if not logger.handlers:
        logger.setLevel(logging.DEBUG)
        console_handler = RichHandler()
        console_handler.setLevel(logging.DEBUG)
        formatter = logging.Formatter(
            "%(asctime)s - %(name)s - %(levelname)s - %(message)s"
        )
        console_handler.setFormatter(formatter)
        logger.addHandler(console_handler)

    return logger
We’ll easily import it in all of our core scripts.
Since we are at it, let’s also write our utils.py script with some helper functions.
# utils.py

import wave
import contextlib
from pydub import AudioSegment

import hashlib
import datetime

from src import logger

logger = logger.get_console_logger("utils")


def compute_cost_of_audio_track(audio_track_file_path: str):
    file_extension = audio_track_file_path.split(".")[-1].lower()
    duration_seconds = 0
    if file_extension == "wav":
        with contextlib.closing(wave.open(audio_track_file_path, "rb")) as f:
            frames = f.getnframes()
            rate = f.getframerate()
            duration_seconds = frames / float(rate)
    elif file_extension == "mp3":
        audio = AudioSegment.from_mp3(audio_track_file_path)
        duration_seconds = len(audio) / 1000.0  # pydub returns duration in milliseconds
    else:
        logger.error(f"Unsupported file format: {file_extension}")
        return

    audio_duration_in_minutes = duration_seconds / 60
    cost = round(audio_duration_in_minutes, 2) * 0.006  # default price of whisper model
    logger.info(f"Cost to convert {audio_track_file_path} is ${cost:.2f}")
    return cost


def hash_text(text: str) -> str:
    return hashlib.md5(text.encode()).hexdigest()


def convert_timestamp_to_datetime(timestamp: str) -> str:
    return datetime.datetime.fromtimestamp(int(timestamp)).strftime("%Y-%m-%d %H:%M:%S")
We won’t end up using the compute_cost_of_audio_track function in this version of the tool, but I’ve included it nonetheless if you want to use it instead.
hash_text is going to be used a lot to create the hash IDs to insert in the database, while convert_timestamp_to_datetime is useful to understand the default datetime object placed in the database upon item creation.
Now let’s look at the database setup. We’ll setup the traditional CRUD interface:
# db.py

from sqlmodel import SQLModel, create_engine, Session, select
from src.schema import Information
from src.logger import get_console_logger

sqlite_file_name = "database.db"
sqlite_url = f"sqlite:///{sqlite_file_name}"
engine = create_engine(sqlite_url, echo=False)

logger = get_console_logger("db")

SQLModel.metadata.create_all(engine)


def read_one(hash_id: dict):
    with Session(engine) as session:
        statement = select(Information).where(Information.hash_id == hash_id)
        information = session.exec(statement).first()
        return information


def add_one(data: dict):
    with Session(engine) as session:
        if session.exec(
            select(Information).where(Information.hash_id == data.get("hash_id"))
        ).first():
            logger.warning(f"Item with hash_id {data.get('hash_id')} already exists")
            return None  # or raise an exception, or handle as needed
        information = Information(**data)
        session.add(information)
        session.commit()
        session.refresh(information)
        logger.info(f"Item with hash_id {data.get('hash_id')} added to the database")
        return information


def update_one(hash_id: dict, data: dict):
    with Session(engine) as session:
        # Check if the item with the given hash_id exists
        information = session.exec(
            select(Information).where(Information.hash_id == hash_id)
        ).first()
        if not information:
            logger.warning(f"No item with hash_id {hash_id} found for update")
            return None  # or raise an exception, or handle as needed
        for key, value in data.items():
            setattr(information, key, value)
        session.commit()
        logger.info(f"Item with hash_id {hash_id} updated in the database")
        return information


def delete_one(id: int):
    with Session(engine) as session:
        # Check if the item with the given hash_id exists
        information = session.exec(
            select(Information).where(Information.hash_id == id)
        ).first()
        if not information:
            logger.warning(f"No item with hash_id {id} found for deletion")
            return None  # or raise an exception, or handle as needed
        session.delete(information)
        session.commit()
        logger.info(f"Item with hash_id {id} deleted from the database")


def add_many(data: list):
    with Session(engine) as session:
        for info in data:
            # Reuse add_one function for each item
            result = add_one(info)
            if result is None:
                logger.warning(
                    f"Item with hash_id {info.get('hash_id')} could not be added"
                )
            else:
                logger.info(
                    f"Item with hash_id {info.get('hash_id')} added to the database"
                )
        session.commit()  # Commit at the end of the loop


def delete_many(ids: list):
    with Session(engine) as session:
        for id in ids:
            # Reuse delete_one function for each item
            result = delete_one(id)
            if result is None:
                logger.warning(f"No item with hash_id {id} found for deletion")
            else:
                logger.info(f"Item with hash_id {id} deleted from the database")
        session.commit()  # Commit at the end of the loop


def read_all(query: dict = None):
    with Session(engine) as session:
        statement = select(Information)
        if query:
            statement = statement.where(
                *[getattr(Information, key) == value for key, value in query.items()]
            )
        information = session.exec(statement).all()
        return information


def delete_all():
    with Session(engine) as session:
        session.exec(Information).delete()
        session.commit()
        logger.info("All items deleted from the database")
With this script, we’ll be able to create the database and easily read, create, delete and update items one by one or in bulk.
Now that we have our information structure and an interface to the database, we’ll move to the management of audio files.
Whisper Model to Create Transcriptions
This was a completely optional step, but I wanted to spice things up. Our code will allow users to upload any .mp3 or .wav files and transcribe their contents through OpenAI’s Whisper model. My persona in mind was a university student that could collect his notes via voice recording.
Keep in mind Whisper is a paid model. At the time of writing this article, the price was $0.006 / minute. You can learn more at this link.
Let’s create whisper.py and a single function called create_transcript.
from src.logger import get_console_logger

logger = get_console_logger("whisper")


def create_transcript(openai_client, file_path: str) -> None:
    audio_file = open(file_path, "rb")
    logger.info(f"Creating transcript for {file_path}")
    transcript = openai_client.audio.transcriptions.create(
        model="whisper-1", file=audio_file
    )
    logger.info(f"Transcript created for {file_path}")
    return transcript.text
This function is very simple, and it is just a simple wrapper around OpenAI’s audio module.
The attentive eye will notice that openai_client is an argument to the function. That is not a mistake, and we’ll see why in just a moment.
Now we can handle text in all (of the supported) forms, which are basic text and audio. It is time to vectorize these texts and push them to our Upstash vector database.
Upstash Vector Database Setup
We’ll be using several additional tools here to properly embed our documents for vector search and RAG.
Tiktoken: the famous library by OpenAI that allows for simple and efficient tokenization based on LLM (in our case, GPT-3.5)
LangChain: I love this library, and find it very flexible despite what portion of the community says about it. In this project, I borrow from it the RecursiveCharacterTextSplitter object
Again, if you cloned the repo, Poetry will import the required dependencies automatically. If not, just run the command poetry add langchain tiktoken.
Of course, we’ll also need to install Upstash Vector — the command is poetry add upstash-vector. Once installed, visit the page https://console.upstash.com/ to setup your cloud environment.
Make sure you choose 1536 as vector dimensionality to match the size of OpenAI ADA model.
As I mentioned before, Upstash is a paid tool, but they do have a very generous free tier that I used extensively for this project.
Free: The free plan is suitable for small projects. It has a limit of 10,000 queries and 10,000 updates limit daily.
This is great to get started building projects like these. Scalability, in addition, is not an issue since you can easily tune your requirements.
Once done, get a hold of your REST url and token

Now we are ready to write our script.
# vector_db.py

from src.logger import get_console_logger

import tiktoken
from langchain.text_splitter import RecursiveCharacterTextSplitter
from upstash_vector import Vector
from tqdm import tqdm
import random

logger = get_console_logger("vector_db")

MODEL = "text-embedding-ada-002"
ENCODER = tiktoken.encoding_for_model("gpt-3.5-turbo")


def token_len(text):
    """Calculate the token length of a given text.

    Args:
        text (str): The text to calculate the token length for.

    Returns:
        int: The number of tokens in the text.
    """
    return len(ENCODER.encode(text))


def get_embeddings(openai_client, chunks, model=MODEL):
    """Get embeddings for a list of text chunks using the specified model.

    Args:
        openai_client: The OpenAI client instance to use for generating embeddings.
        chunks (list of str): The text chunks to embed.
        model (str): The model identifier to use for embedding.

    Returns:
        list of list of float: A list of embeddings, each corresponding to a chunk.
    """
    chunks = [c.replace("\n", " ") for c in chunks]
    res = openai_client.embeddings.create(input=chunks, model=model).data
    return [r.embedding for r in res]


def get_embedding(openai_client, text, model=MODEL):
    """Get embedding for a single text using the specified model.

    Args:
        openai_client: The OpenAI client instance to use for generating the embedding.
        text (str): The text to embed.
        model (str): The model identifier to use for embedding.

    Returns:
        list of float: The embedding of the given text.
    """
    # text = text.replace("\n", " ")
    return get_embeddings(openai_client, [text], model)[0]


def query_vector_db(index, openai_client, question, top_n=1):
    """Query the vector database for similar vectors to the given question.

    Args:
        index: The vector database index to query.
        openai_client: The OpenAI client instance to use for generating the question embedding.
        question (str): The question to query the vector database with.
        system_prompt (str, optional): An additional prompt to provide context for the question. Defaults to an empty string.
        top_n (int, optional): The number of top similar vectors to return. Defaults to 1.

    Returns:
        str: A string containing the concatenated texts of the top similar vectors.
    """
    logger.info("Creating vector for question...")
    question_embedding = get_embedding(openai_client, question)
    logger.info("Querying vector database...")
    res = index.query(vector=question_embedding, top_k=top_n, include_metadata=True)
    context = "\n-".join([r.metadata["text"] for r in res])
    logger.info(f"Context returned. Length: {len(context)} characters.")
    return context


def create_chunks(text, chunk_size=150, chunk_overlap=20):
    """Create text chunks based on specified size and overlap.

    Args:
        text (str): The text to split into chunks.
        chunk_size (int, optional): The desired size of each chunk. Defaults to 150.
        chunk_overlap (int, optional): The number of overlapping characters between chunks. Defaults to 20.

    Returns:
        list of str: A list of text chunks.
    """
    text_splitter = RecursiveCharacterTextSplitter(
        chunk_size=chunk_size,
        chunk_overlap=chunk_overlap,
        length_function=token_len,
        separators=["\n\n", "\n", " ", ""],
    )
    return text_splitter.split_text(text)


def add_chunks_to_vector_db(index, chunks, metadata):
    """Embed text chunks and add them to the vector database.

    Args:
        index: The vector database index to add chunks to.
        chunks (list of str): The text chunks to embed and add.
        metadata (dict): The metadata to associate with each chunk.

    Returns:
        None
    """
    for chunk in chunks:
        random_id = random.randint(0, 1000000) # workaround while waiting for metadata search to be implemented
        metadata["text"] = chunk
        vec = Vector(
            id=f"chunk-{random_id}", vector=get_embedding(chunk), metadata=metadata
        )
        index.upsert(vectors=[vec])
        logger.info(f"Added chunk to vector db: {chunk}")


def fetch_by_source_hash_id(index, source_hash_id: str, max_results=10000):
    """Fetch vector IDs from the database by source hash ID.

    Args:
        index: The vector database index to search.
        source_hash_id (str): The source hash ID to filter the vectors by.
        max_results (int, optional): The maximum number of results to return. Defaults to 10000.

    Returns:
        list of str: A list of vector IDs that match the source hash ID.
    """
    ids = []
    for i in tqdm(range(0, max_results, 1000)):
        search = index.range(
            cursor=str(i), limit=1000, include_vectors=False, include_metadata=True
        ).vectors
        for result in search:
            if result.metadata["source_hash_id"] == source_hash_id:
                ids.append(result.id)
    return ids


def fetch_all(index):
    """Fetch all vectors from the database.

    Args:
        index: The vector database index to fetch vectors from.

    Returns:
        list: A list of vectors from the database.
    """
    return index.range(
        cursor="0", limit=1000, include_vectors=False, include_metadata=True
    ).vectors
There’s more going on in this script so let me dive deeper for a moment.
get_embedding and get_embeddings are used to encode one or multiple texts. Just conveniently placed here for better control.
query_vector_db allows us to query Upstash for similar items to our query vector. In this function, we embed the query and perform the look up through the index’s .query method. The index, together with OpenAI’s client, are passed in as arguments later in the Streamlit app. The returned object is a string called context which is a concatenation of the top N most similar items to the input query.
Continuing, we leverage LangChain’s RecursiveCharacterTextSplitter to efficiently create textual chunks from the documents.
Now a bit of CRUD interface also for the vector DB: adding and fetching data (updating and deletion are easily performed too and we’ll do that in the frontend).
Note: at the time of writing this article, Upstash doesn’t yet support search on metadata. This means that since we are using hash_id to identify our documents, these aren’t directly querable. I’ve added a simple workaround in the code to browse through a bunch (100k) documents and look up for the hash ID manually. I have read online they’ll be implementing this functionality soon.
LLM Agents To Build the Network Graph
We’ll start working on coding our LLM behaviors by working on prompts first.
There are going to be two agents. The first one is responsible for extracting network data from the text, while the second is responsible for analyzing that network data.
The prompt to the first agent is the following:
You are an expert in creating network graphs from textual data.
You are also a note-taking expert and you are able to create mind maps from text.
You are tasked with creating a mind map from a given text data by extracting the concepts and relationships from the text.\n
The relationships should be among objects, people, or places mentioned in the text.\n

TYPES should only be one of the following:
- is a
- is related to
- is part of
- is similar to
- is different from
- is a type of

Your output should be a JSON containing the following:
{ "relationships": [{"source": ..., "target": ..., "type": ..., "origin": _source_or_target_}, {...}] } \n
- source: The source node\n
- target: The target node\n
- type: The type of the relationship between the source and target nodes\n


NEVER change this output format. ENGLISH is the output language. NEVER change the output language.
Your response will be used as a Python dictionary, so be always mindful of the syntax and the data types to return a JSON object.\n

INPUT TEXT:\n
The analyzer agent is instead using this prompt
You are a senior business intelligence analyst, who is able to extract valuable insights from data.
You are tasked with extracting information from a given mind map data.\n
The mind map data is a JSON containing the following:
{{ "relationships": [{{"source": ..., "target": ..., "type": ..."origin": _source_or_target_}}, {{...}}] }} \n
- source: The source node\n
- target: The target node\n
- type: The type of the relationship between the source and target nodes\n
- origin: The origin node from which the relationship originates\n

You are to extract insights from the mind map data and provide a summary of the relationships.\n

Your output should be a brief comment on the mind map data, highlighting relevant insights and relationships using centrality and other graph analysis techniques.\n

NEVER change this output format. ENGLISH is the output language. NEVER change the output language.\n
Keep your output very brief. Just a comment to highlight the top most relevant information.

MIND MAP DATA:\n
{mind_map_data}
These two prompts will be imported in the Pythonic way: that is, as scripts.
Let’s create a script in the LLM folder called prompts.py and create a dictionary of intents where we place the prompts as values.
# llm.prompts.py

PROMPTS = {
    "mind_map_of_one": """You are an expert in creating network graphs from textual data.
    You are also a note-taking expert and you are able to create mind maps from text.
    You are tasked with creating a mind map from a given text data by extracting the concepts and relationships from the text.\n
    The relationships should be among objects, people, or places mentioned in the text.\n

    TYPES should only be one of the following:
    - is a
    - is related to
    - is part of
    - is similar to
    - is different from
    - is a type of

    Your output should be a JSON containing the following:
    { "relationships": [{"source": ..., "target": ..., "type": ...}, {...}] } \n
    - source: The source node\n
    - target: The target node\n
    - type: The type of the relationship between the source and target nodes\n


    NEVER change this output format. ENGLISH is the output language. NEVER change the output language.
    Your response will be used as a Python dictionary, so be always mindful of the syntax and the data types to return a JSON object.\n

    INPUT TEXT:\n
""",
    "inspector_of_mind_map": """
    You are a senior business intelligence analyst, who is able to extract valuable insights from data.
    You are tasked with extracting information from a given mind map data.\n
    The mind map data is a JSON containing the following:
    {{ "relationships": [{{"source": ..., "target": ..., "type": ...}}, {{...}}] }} \n
    - source: The source node\n
    - target: The target node\n
    - type: The type of the relationship between the source and target nodes\n
    - origin: The origin node from which the relationship originates\n

    You are to extract insights from the mind map data and provide a summary of the relationships.\n

    Your output should be a brief comment on the mind map data, highlighting relevant insights and relationships using centrality and other graph analysis techniques.\n

    NEVER change this output format. ENGLISH is the output language. NEVER change the output language.\n
    Keep your output very brief. Just a comment to highlight the top most relevant information.

    MIND MAP DATA:\n
    {mind_map_data}
    """,
}
In this way we can easily import and use the prompts simply by pointing at the agent’s intent (mind_map_of_one, inspector_of_mind_map). We’ll import the prompts in the llm.py script.
# llm.llm.py

from src.logger import get_console_logger
from src.llm.prompts import PROMPTS


logger = get_console_logger("llm")
MIND_MAP_EXTRACTION_MODEL = "gpt-4-turbo-preview"
MIND_MAP_INSPECTION_MODEL = "gpt-4"

def extract_mind_map_data(openai_client: object, text: str) -> None:
    logger.info(f"Extracting mind map data from text...")
    response = openai_client.chat.completions.create(
        model=MIND_MAP_EXTRACTION_MODEL,
        response_format={"type": "json_object"},
        temperature=0,
        messages=[
            {"role": "system", "content": PROMPTS["mind_map_of_one"]},
            {"role": "user", "content": f"{text}"},
        ],
    )
    return response.choices[0].message.content


def extract_mind_map_data_of_two(
    openai_client: object, source_text: str, target_text: str
) -> None:
    logger.info(f"Extracting mind map data from two texts...")
    user_prompt = PROMPTS["mind_map_of_many"].format(
        source_text=source_text, target_text=target_text
    )
    response = openai_client.chat.completions.create(
        model=MIND_MAP_INSPECTION_MODEL,
        response_format={"type": "json_object"}, # this is very important!
        messages=[
            {"role": "system", "content": PROMPTS["mind_map_of_many"]},
            {"role": "user", "content": user_prompt},
        ],
    )
    return response.choices[0].message.content


def extract_information_from_mind_map_data(openai_client_ object, data: dict) -> None:
    logger.info(f"Extracting information from mind map data...")
    user_prompt = PROMPTS["inspector_of_mind_map"].format(mind_map_data=data)
    response = openai_client.chat.completions.create(
        model="gpt-4",
        messages=[
            {"role": "system", "content": PROMPTS["inspector_of_mind_map"]},
            {"role": "user", "content": user_prompt},
        ],
    )
    return response.choices[0].message.content
All the heavy work is done by the two simple functions that simply connect an GPT agent to the appropriate prompt. Note response_format={“type"=”json_object"} in the first function. This ensures that GPT-4 builds a JSON representation of the text’s network data. Without this line, the entire application becomes incredibly unstable.
Let’s put the logic to the test. When passed the prompt “Who is Andrej Karpathy?” the first agent creates this network representation:
{
   "relationships":[
      {
         "source":"Andrej Karpathy",
         "target":"Slovak-Canadian",
         "type":"is a"
      },
      {
         "source":"Andrej Karpathy",
         "target":"computer scientist",
         "type":"is a"
      },
      {
         "source":"Andrej Karpathy",
         "target":"director of artificial intelligence and Autopilot Vision at Tesla",
         "type":"served as"
      },
      {
         "source":"Andrej Karpathy",
         "target":"OpenAI",
         "type":"worked at"
      },
      {
         "source":"Andrej Karpathy",
         "target":"deep learning",
         "type":"specialized in"
      },
      {
         "source":"Andrej Karpathy",
         "target":"computer vision",
         "type":"specialized in"
      },
      {
         "source":"Andrej Karpathy",
         "target":"Bratislava, Czechoslovakia",
         "type":"was born in"
      },
      {
         "source":"Andrej Karpathy",
         "target":"Toronto",
         "type":"moved to"
      },
      {
         "source":"Andrej Karpathy",
         "target":"University of Toronto",
         "type":"completed degrees at"
      },
      {
         "source":"Andrej Karpathy",
         "target":"University of British Columbia",
         "type":"completed master's degree at"
      },
      {
         "source":"Andrej Karpathy",
         "target":"OpenAI",
         "type":"is a founding member of"
      },
      {
         "source":"Andrej Karpathy",
         "target":"Tesla",
         "type":"became director of artificial intelligence at"
      },
      {
         "source":"Andrej Karpathy",
         "target":"Elon Musk",
         "type":"reported to"
      },
      {
         "source":"Andrej Karpathy",
         "target":"MIT Technology Review's Innovators Under 35 for 2020",
         "type":"was named one of"
      },
      {
         "source":"Andrej Karpathy",
         "target":"YouTube videos on how to create artificial neural networks",
         "type":"makes"
      },
      {
         "source":"Andrej Karpathy",
         "target":"Stanford University",
         "type":"received a PhD from"
      },
      {
         "source":"Fei-Fei Li",
         "target":"Stanford University",
         "type":"is part of"
      },
      {
         "source":"Andrej Karpathy",
         "target":"natural language processing",
         "type":"focused on"
      },
      {
         "source":"Andrej Karpathy",
         "target":"CS 231n: Convolutional Neural Networks for Visual Recognition",
         "type":"authored and was the primary instructor of"
      },
      {
         "source":"CS 231n: Convolutional Neural Networks for Visual Recognition",
         "target":"Stanford",
         "type":"is part of"
      }
   ]
}
This data comes from unstructured Wikipedia text uploaded in the tool for testing purposes. The representation seems just fine! Feel free to edit the prompts to extract even more potential information.
All that remains now is to use this Python dictionary of relationships to create our interactive mind map with NetworkX and Plotly.
Building the Mind Map with NetworkX and Plotly
There’s going to be one function only, but is going to be quite intense if you’ve never worked with NetworkX before. It is not the simplest framework to work with, but the outputs you can get from becoming proficient at it are valuable.
What we’ll do is initialize a graph object with G = nx.DiGraph(), which creates a new directed graph. The function iterates over a list of relationships provided in the data dictionary. For each relationship, it adds an edge to the graph G from the source node to the target node, with an attribute type that describes the relationship.
for relationship in data["relationships"]:
        G.add_edge(
            relationship["source"], relationship["target"], type=relationship["type"]
        )
Once done, the graph’s layout is computed using the spring layout algorithm, which positions the nodes in a way that tries to minimize the overlap between edges and keep the edges’ lengths uniform. The seed parameter ensures that the layout is reproducible.
Finally, Plotly’s Graph Objects (go) module takes care of creating scatterplots for each data point, representing a node on the chart.
Here’s how the mind_map.py script appears.
# mind_map.py

import networkx as nx
from graphviz import Digraph

import plotly.express as px
import plotly.graph_objects as go


def create_plotly_mind_map(data: dict) -> go.Figure:
    """
    data is a dictionary containing the following
    { "relationships": [{"source": ..., "target": ..., "type": ...}, {...}] }
    source: The source node
    target: The target node
    type: The type of the relationship between the source and target nodes
    """

    ### START - NETWORKX LOGIC ###
    # Create a directed graph
    G = nx.DiGraph()

    # Add edges to the graph
    for relationship in data["relationships"]:
        G.add_edge(
            relationship["source"], relationship["target"], type=relationship["type"]
        )

    # Create a layout for our nodes
    layout = nx.spring_layout(G, seed=42)

    traces = []
    for relationship in data["relationships"]:
        x0, y0 = layout[relationship["source"]]
        x1, y1 = layout[relationship["target"]]
        edge_trace = go.Scatter(
            x=[x0, x1, None],
            y=[y0, y1, None],
            line=dict(width=0.5, color="#888"),  # Set a single color for all edges
            hoverinfo="none",
            mode="lines",
        )
        traces.append(edge_trace)

    # Modify node trace to color based on source node
    node_x = []
    node_y = []
    for node in G.nodes():
        x, y = layout[node]
        node_x.append(x)
        node_y.append(y)

    ### END - NETWORKX LOGIC ###

    node_trace = go.Scatter(
        x=node_x,
        y=node_y,
        mode="markers+text",
        # add text to the nodes and origin
        text=[node for node in G.nodes()],
        hoverinfo="text",
        marker=dict(
            showscale=False,
            colorscale="Greys",  # Change colorscale to grayscale
            reversescale=True,
            size=20,
            color='#505050',  # Set node color to gray
            line_width=2,
        ),
    )

    # Add node and edge labels
    edge_annotations = []
    for edge in G.edges(data=True):
        x0, y0 = layout[edge[0]]
        x1, y1 = layout[edge[1]]
        edge_annotations.append(
            dict(
                x=(x0 + x1) / 2,
                y=(y0 + y1) / 2,
                xref="x",
                yref="y",
                text=edge[2]["type"],
                showarrow=False,
                font=dict(size=10),
            )
        )

    node_annotations = []
    for node in G.nodes():
        x, y = layout[node]
        node_annotations.append(
            dict(
                x=x,
                y=y,
                xref="x",
                yref="y",
                text=node,
                showarrow=False,
                font=dict(size=12),
            )
        )

    node_trace.text = [node for node in G.nodes()]

    # Create the figure
    fig = go.Figure(
        data=traces + [node_trace],
        layout=go.Layout(
            showlegend=False,
            hovermode="closest",
            margin=dict(b=20, l=5, r=5, t=40),
            annotations=edge_annotations,
            xaxis=dict(showgrid=False, zeroline=False, showticklabels=False),
            yaxis=dict(showgrid=False, zeroline=False, showticklabels=False),
        ),
    )

    # Modify the layout to include the legend
    fig.update_layout(
        legend=dict(
            title="Origins",
            traceorder="normal",
            font=dict(size=12),
        )
    )

    # Modify the node text color for better visibility on dark background
    node_trace.textfont = dict(color="white")

    # Modify the layout to include the legend and set the plot background to dark
    fig.update_layout(
        paper_bgcolor="rgba(0,0,0,1)",  # Set the background color to black
        plot_bgcolor="rgba(0,0,0,1)",  # Set the plot area background color to black
        legend=dict(
            title="Origins",
            traceorder="normal",
            font=dict(size=12, color="white"),  # Set legend text color to white
        ),
        xaxis=dict(showgrid=False, zeroline=False, showticklabels=False),
        yaxis=dict(showgrid=False, zeroline=False, showticklabels=False),
    )

    for annotation in edge_annotations:
        annotation["font"]["color"] = "white"  # Set edge annotation text color to white

    # Update the color of the node annotations for better visibility
    for annotation in node_annotations:
        annotation["font"]["color"] = "white"  # Set node annotation text color to white

    # Update the edge trace color to be more visible on a dark background
    for trace in traces:
        if "line" in trace:
            trace["line"][
                "color"
            ] = "#888"  # Set edge color to a single color for all edges

    # Update the node trace marker border color for better visibility
    node_trace.marker.line.color = "white"

    return fig
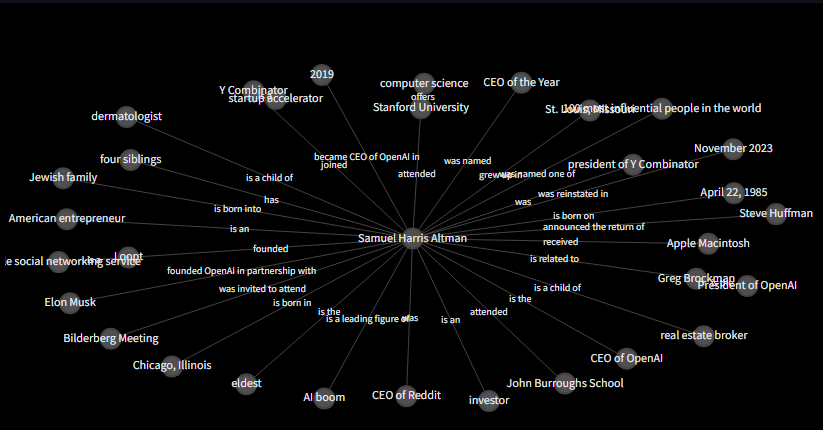
Feel free to simply copy-paste this function in your logic and change it as you please.
And this is how the mind map appears for the prompt “Who is Sam Altman?”
Great work! We are done with the backend logic! Our last step is to implement the Streamlit app.
The Final Step: The Frontend App with Streamlit
We are almost there. Thank you for reading so far. Hope you enjoyed the journey up until now.
We’ll use a functional approach to building the Streamlit app — this means all logical blocks will be build by calling functions. This is the structure of the app
Setup the page
Setup the hero / intro of the page
Setup the sidebar
Coding the file ingestion logic
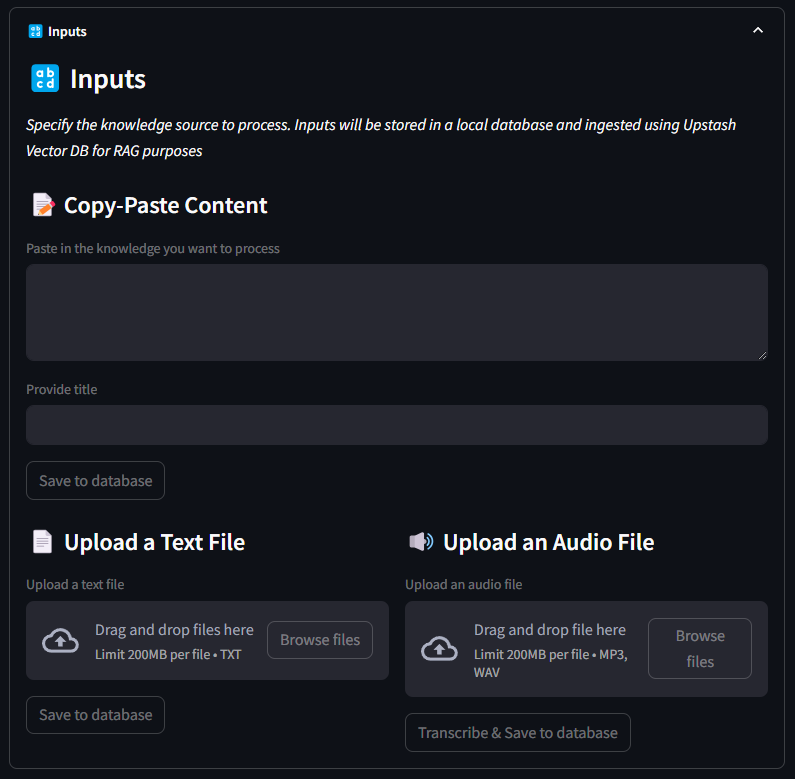
Setup the inputs section
Visualize the database
Render the mind map
Start the engines!
We’ll import the database modules to add, remove and update elements. We’ll import the utils and the schema files to ensure validation through Pydantic and also import the vector db logic, mind map and llm. Basically, all that we’ve built!
NamedTemporaryFile helps us momentarily save the uploaded files to grab useful data for storage.
This is how the frontend is coded:
# frontend.py

import streamlit as st

from src.logger import get_console_logger
from src.utils import hash_text, convert_timestamp_to_datetime
from src.schema import FileType
from src import db
from src.whisper import create_transcript
from src import vector_db
from src import mind_map
from src.llm import llm

from tempfile import NamedTemporaryFile

import pandas as pd

from openai import OpenAI
from upstash_vector import Index

logger = get_console_logger("frontend")

# CONSTANTS
AUDIO_FILE_TYPES = ["mp3", "wav"]
PAGE_TITLE = "Mind Mapper | Create mind maps from your files"
PAGE_ICON = "🧠"
LAYOUT = "wide"
SIDEBAR_STATE = "expanded"

if "OPENAI_API_KEY" not in st.session_state:
    st.session_state["OPENAI_API_KEY"] = ""
if "UPSTASH_VECTOR_DB_REST_URL" not in st.session_state:
    st.session_state["UPSTASH_VECTOR_DB_REST_URL"] = ""
if "UPSTASH_VECTOR_DB_TOKEN" not in st.session_state:
    st.session_state["UPSTASH_VECTOR_DB_TOKEN"] = ""

openai_client = OpenAI(api_key=st.session_state["OPENAI_API_KEY"])
vector_db_index = Index(
    url=st.session_state["UPSTASH_VECTOR_DB_REST_URL"],
    token=st.session_state["UPSTASH_VECTOR_DB_TOKEN"],
)

def setup_page():
    st.set_page_config(
        page_title=PAGE_TITLE,
        page_icon=PAGE_ICON,
        layout=LAYOUT,
        initial_sidebar_state=SIDEBAR_STATE,
    )


def setup_hero():
    st.markdown(
        """
        # Mind Mapper 🧠
        _A simple tool of knowledge intelligence and visualization_ tool powered by <b>OpenAI</b>, <b>Upstash Vector DB</b> and a bit of magic ✨
        """,
        unsafe_allow_html=True,
    )


def setup_sidebar():
    with st.sidebar:
        st.markdown("## 🔑 API Keys")
        # Example for setting up an API key input for OpenAI
        st.markdown(
            "### OpenAI"
            "\nGet your API key [here](https://platform.openai.com/docs/quickstart?context=python)"
        )
        openai_api_key = st.text_input(label="OpenAI API Key", type="password")
        # Example for setting up an API key input for Upstash Vector DB
        st.markdown(
            "### Upstash Vector DB"
            "\nSetup your Vector DB [here](https://console.upstash.com/)"
        )
        upstash_vector_db_rest_url = st.text_input(
            label="Upstash Vector DB REST url", type="default"
        )
        upstash_vector_db_token = st.text_input(
            label="Upstash Vector DB Token", type="password"
        )

        # Add a button to confirm the API keys setup
        if st.button("Set API Keys"):
            st.session_state["OPENAI_API_KEY"] = openai_api_key
            st.session_state["UPSTASH_VECTOR_DB_REST_URL"] = upstash_vector_db_rest_url
            st.session_state["UPSTASH_VECTOR_DB_TOKEN"] = upstash_vector_db_token
            st.success("API keys set successfully")


def ingest(hash_id: str):
    # TODO
    with st.spinner("Ingesting file..."):
        # Assuming 'row' is defined elsewhere and accessible here
        q = db.read_one(hash_id)
        if not q.embedded:
            chunks = vector_db.create_chunks(q.text)
            vector_db.add_chunks_to_vector_db(
                vector_db_index, chunks, metadata={"source_hash_id": q.hash_id}
            )
            db.update_one(q.hash_id, {"embedded": True})
            st.success(f"Item {hash_id} ingested")
        else:
            st.warning(f"Item {hash_id} already ingested")


def text_input_area():
    st.markdown("### 🔡 Inputs")
    st.markdown(
        "_Specify the knowledge source to process. Inputs will be stored in a local database and ingested using Upstash Vector DB for RAG purposes_"
    )
    st.markdown("#### 📝 Copy-Paste Content")
    text = st.text_area(
        "Paste in the knowledge you want to process",
        height=50,
        key="text_area",
        disabled=True,
    )
    title = st.text_input("Provide title", key="title_text_area", disabled=True)
    # save to db
    if st.button("Save to database", key="text_area_save", disabled=True):
        if text and title:
            hash_id = hash_text(text)
            db.add_one(
                {
                    "filename": "*manual_input*",
                    "title": title,
                    "file_type": FileType.TEXT,
                    "hash_id": hash_id,
                    "text": text,
                }
            )
            ingest(hash_id)
            st.success("Text saved to database")
        else:
            st.warning("Please enter text and title to proceed.")


def upload_text_file():
    st.markdown("#### 📄 Upload a Text File")
    uploaded_text_file = st.file_uploader(
        "Upload a text file",
        type=["txt"],  # Use the constant for file types
        accept_multiple_files=True,
        disabled=True,
    )
    # save to db
    if st.button("Save to database", key="upload_text_save", disabled=True):
        progress_text = "Saving text files to database..."
        progress_bar = st.progress(0, text=progress_text)
        if uploaded_text_file is not None:
            if len(uploaded_text_file) == 1:
                with NamedTemporaryFile(suffix=".txt") as temp_text_file:
                    temp_text_file.write(uploaded_text_file.getvalue())
                    temp_text_file.seek(0)
                    progress_bar.progress(int((1 / len(uploaded_text_file)) * 100))
                    hash_id = hash_text(temp_text_file.name)
                    db.add_one(
                        {
                            "filename": uploaded_text_file.name,
                            "title": uploaded_text_file.name,
                            "file_type": FileType.TEXT,
                            "hash_id": hash_id,
                            "text": temp_text_file.read().decode("utf-8"),
                        }
                    )
                    ingest(hash_id)
                    st.success("Text file saved to database")
            else:
                for file in uploaded_text_file:
                    with NamedTemporaryFile(suffix=".txt") as temp_text_file:
                        temp_text_file.write(file.getvalue())
                        temp_text_file.seek(0)

                        progress_bar.progress(
                            int(
                                (uploaded_text_file.index(file) + 1)
                                / len(uploaded_text_file)
                                * 100
                            )
                        )
                        hash_id = hash_text(temp_text_file.name)
                        db.add_one(
                            {
                                "filename": file.name,
                                "title": file.name,
                                "file_type": FileType.TEXT,
                                "hash_id": hash_id,
                                "text": temp_text_file.read().decode("utf-8"),
                            }
                        )
                        ingest(hash_id)
                        st.success("Text file saved to database")
        else:
            st.warning("Please upload a text file to proceed.")


def upload_audio_file():
    st.markdown("#### 🔊 Upload an Audio File")
    uploaded_audio_file = st.file_uploader(
        "Upload an audio file",
        type=AUDIO_FILE_TYPES,  # Use the constant for file types
        disabled=True,
    )
    if st.button("Transcribe & Save to database", key="transcribe", disabled=True):
        if uploaded_audio_file is not None:
            extension = "." + uploaded_audio_file.name.split(".")[-1]
            with NamedTemporaryFile(suffix=extension) as temp_audio_file:
                temp_audio_file.write(uploaded_audio_file.getvalue())
                temp_audio_file.seek(0)
                with st.spinner("Transcribing audio track..."):
                    transcript = create_transcript(openai_client, temp_audio_file.name)
                    # Check if the transcript already exists in the database
                    existing_item = db.read_one(hash_text(transcript))
                    if existing_item is None:
                        hash_id = hash_text(transcript)
                        db.add_one(
                            {
                                "filename": uploaded_audio_file.name,
                                "title": uploaded_audio_file.name,
                                "file_type": FileType.AUDIO,
                                "hash_id": hash_id,
                                "text": transcript,
                            }
                        )
                        ingest(hash_id)
                        st.success("Transcription complete - item saved in database")
                    else:
                        st.warning("Transcription already exists in the database.")
        else:
            st.warning("Please upload an audio file to proceed.")


def visualize_db():
    st.markdown("### 📊 Database")
    all_files = db.read_all()
    db_data = []
    if len(all_files) > 0:
        for file in all_files:
            struct = file.model_dump()
            db_data.append(
                {
                    "id": struct["hash_id"],
                    "title": struct["title"],
                    "filename": struct["filename"],
                    "file_type": struct["file_type"].value,
                    "created_at": convert_timestamp_to_datetime(struct["created_at"]),
                    "text": struct["text"][0:50] + "...",
                }
            )
        df = pd.DataFrame(db_data).rename(
            columns={
                "id": "ID",
                "title": "Title",
                "file_type": "Type",
                "text": "Text",
                "created_at": "Date",
            }
        )
        st.dataframe(df, use_container_width=True)
        # check if items are in db

        items_selected = st.multiselect(
            "Perform actions on:",
            # [str(i) + " - " + str(j) for i, j in zip(df["title"], df["filename"])],
            df["Title"].to_list(),
            max_selections=10,
        )
        # delete selections from db
        if st.button("Delete selected items", key="delete"):
            for item in items_selected:
                item_id = df[df["Title"] == item]["ID"].values[0]
                db.delete_one(item_id)
                ids_to_delete = vector_db.fetch_by_source_hash_id(
                    vector_db_index, item_id
                )
                st.success(f"Item {item_id} deleted from database")
                try:
                    vector_db_index.delete(ids_to_delete)
                    st.success(f"Item {item_id} deleted from vector database")
                except Exception as e:
                    st.error(f"Vector database deletion failed - {e}")

    else:
        st.info("No items in database")


def create_mind_map():
    st.markdown("### 🧠 Interrogate Knowledge Base")
    # get all document titles from db
    all_files = db.read_all()
    db_data = []
    data = None
    if len(all_files) > 0:
        for file in all_files:
            struct = file.model_dump()
            db_data.append(
                {
                    "hash_id": struct["hash_id"],
                    "title": struct["title"],
                    "created_at": convert_timestamp_to_datetime(struct["created_at"]),
                }
            )
        df = pd.DataFrame(db_data).rename(
            columns={
                "hash_id": "hash_id",
                "title": "title",
                "created_at": "Date",
            }
        )

        prompt = st.chat_input("Ask something about your knowledge base")
        comment = "No data found."
        llm_data = None
        if prompt:
            with st.chat_message("assistant"):
                with st.status("Processing request...", expanded=True):
                    st.write("- Querying vector database...")
                    data = vector_db.query_vector_db(
                        index=vector_db_index,
                        openai_client=openai_client,
                        question=prompt,
                        top_n=5,
                    )
                    if data:
                        st.write("- Extracting mind map...")
                        llm_data = llm.extract_mind_map_data(openai_client, data)
                        llm_data = eval(llm_data)
                        st.write("- Evaluating results...")
                        comment = llm.extract_information_from_mind_map_data(
                            openai_client, llm_data
                        )
            with st.chat_message("assistant"):
                st.write(comment)
                st.plotly_chart(
                    mind_map.create_plotly_mind_map(llm_data),
                    use_container_width=True,
                )
    else:
        st.info("No items in database")


def start_frontend():
    setup_page()
    setup_hero()
    setup_sidebar()
    with st.container(border=True):
        create_mind_map()
    with st.expander("**🔡 Inputs**", expanded=True):
        text_input_area()
        col1, col2 = st.columns(2)
        with col1:
            upload_text_file()
        with col2:
            upload_audio_file()
    with st.expander("**📊 Database**", expanded=False):
        visualize_db()


if __name__ == "__main__":
    start_frontend()
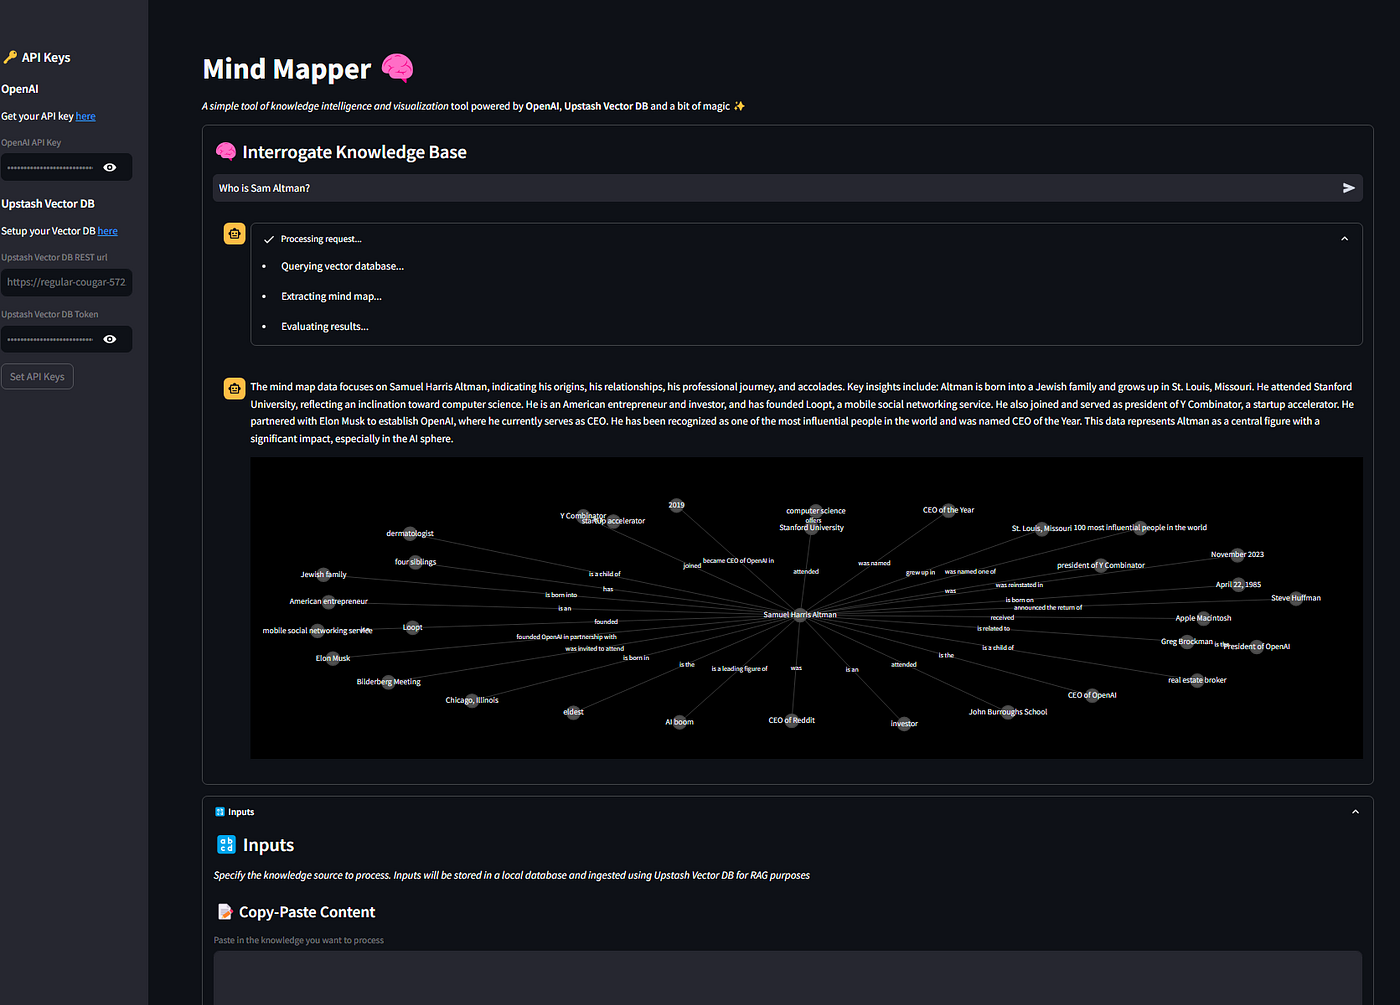
We can start the application by running the command streamlit run src/frontend.py.
This is the end result.
Conclusions
This article showed you how to build a simple yet effective AI application using Streamlit, Upstash and OpenAI that goes beyond the simple RAG framework.
In its simplicity, this application can really help you connect the dots when fed data coming from different sources and prompted correctly.
If you manage to find a useful use case, share your story with me and the community by adding a comment to this article.
Best regards,
Andrea


